Ok, so let’s kick off my first post with MARSHMALLOWS! I've been wanting to make marshmallows for a while – and I was not disappointed
in the slightest when I did! It was almost magical watching it puff up in front
of your eyes. The first batch I made was peanut butter and honey flavour and
they were DELICIOUS! I love peanut butter, so anything with it in goes. I also
really like honey = bonus! The second batch was mint chocolate chip to please the
boyfriend. However, today’s bakes (makes?) have been the best yet....mojito
marshmallows – WITH rum. Sha ‘tiiiing! So good.
My little helper:
So a quick synopsis!
Marshmallow ingredients:
- 2 and a quarter cups caster sugar
- 1 tbsp glucose syrup
- 1tbsp mint leaves
- 2 tbsp powdered gelatine
- 2 egg whites
- 50ml rum
- 1tsp lime zest (I used about 1.5 tbsp!)
- 2 and a quarter cups caster sugar
- 1 tbsp glucose syrup
- 1tbsp mint leaves
- 2 tbsp powdered gelatine
- 2 egg whites
- 50ml rum
- 1tsp lime zest (I used about 1.5 tbsp!)
Mint sugar coating ingredients:
3/4 cup Demerara sugar (I would say do 1.5 cups)
1/4 cup mint leaves (I would do 1/2 cup instead)
3/4 cup Demerara sugar (I would say do 1.5 cups)
1/4 cup mint leaves (I would do 1/2 cup instead)
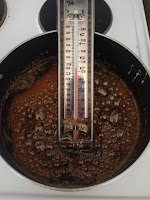
First, dissolve 2
cups of the sugar, the glucose syrup and 185ml of water, over a low heat, in a
saucepan. Once the sugar has all dissolved, add the mint leaves and pop in the
sugar thermometer (which you will be lost without!) and leave it alone. Don’t
touch it. No, really. Don’t.
Whilst you leave the
sugar mixture to simmer away, pour your gelatine over 160ml of cold water in a
microwaveable container. Leave it to stand for 5 minutes, then microwave on a
high heat for 40 seconds, until the gelatine has all dissolved. Leave it to
stand. Once the sugar has reached 115⁰C (STILL DON’T TOUCH IT!), you can start
preparing your egg whites.
On a medium speed, in
an electric mixer with the whisk attachment, mix until fluffy. Turn up to a
medium high speed and add in the rest of the sugar. When it has gone nice and
shiny, turn the speed back down to medium.
By this point the sugar mix should be nearing 127⁰C. This is what you’re looking for.
Remove it from the heat and let the bubbles die away. Remove
the mint leaves with a fork. You can now add your gelatine mix slowly into the
sugar syrup. Do not pour it too quickly or else it may bubble up. With the
electric mixer still whisking, pour the sugar/gelatine mix slowly into the
eggs. Turn the mixer up to high and beat for 12 minutes. It will be thick and
hold its shape when it’s ready. Now add your lime zest and rum.
Pour into your container.
Leave to stiffen for 3 hours. Whilst you wait for it to firm
up you can make some mint sugar. Preheat the oven to 110⁰C. Blend together the
mint leaves and sugar. This is where I would change the recipe. I would use
more of each as half way through covering my final marshmallows I ran out of
mixture. Spread the mix onto a baking tray and leave in the oven for about 15
minutes or until it has all dried out.
Once the marshmallow has stiffened, cut it with an oiled
knife (I have this swanky roller), and roll each piece in the mint sugar. Store
in an airtight container.
Changes I would make to the recipe:
-
Mix together more mint and sugar
-
I found the coating of the mint sugar too crunchy
afterwards – it stole from the marshmallow itself (even though it is still
incredibly tasty), so I would blend the sugar and mint again once it has dried
out to create finer crystals and a smoother, less powerful covering.
These were so so so so good, and actually did taste like a
delicious mojito. I strongly recommend making these. I lost one to the
neighbour as I was photographing them in the garden, they were that good! In
the next couple of weeks I am going to be posting a teacake recipe, so get practising
your marshmallows for that! Send me pictures to the Heels & Horseshoes Facebook
page if you do make some – I’d love to see them.
--Emma


No comments:
Post a Comment